Friday, March 29, 2013

Take red fabric and add scraps


Most of my quilts these days are very traditional and take ages to make but I miss playing with the brighter free and easy ones I used to do way back when.
I decided that it would be a good idea to keep an afternoon or two free in the weekends to play in the sewing room and that way I could still stay focused during the week on the big slow burning quilts in progress. Sounds like a good plan to me.
These blocks are from the Freddy Moran and Gwen Marston book called Freddy and Gwen Collaborate Again.
It's a perfect fit for my weekend play, no pinning, no templates and no size restrictions.
Even better, I get to use red, red and more red fabric from the stash. Add some strips from the scrap bag and it's practically a free quilt.
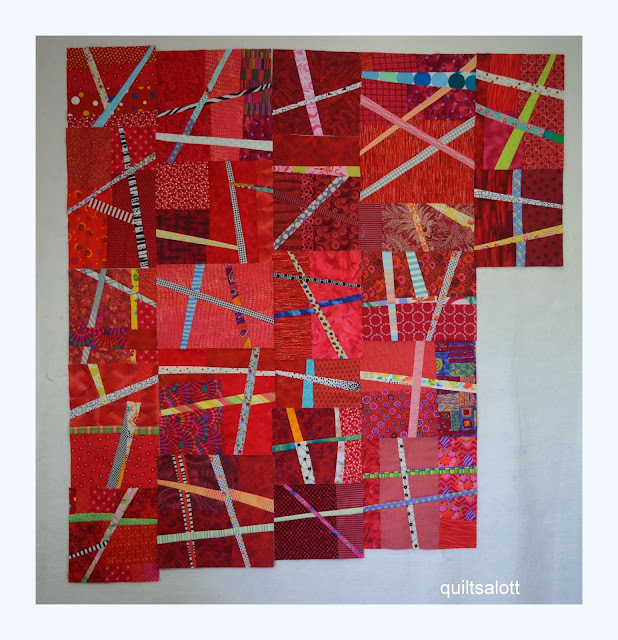
 
I have to acknowledge LeeAnne over at Nifty quilts who inspired me with this version  she put together after a block swap.
 
Sujata over at The Root Connection who delights me with the idea that any scraps can be put together and result in something fabulous.
 
Victoria of 15 minutes of play fame who taught me that I can even make my own new fabric by joining the scraps together.
Seeds are sewn by what we see and experience.
  
 
I bought this pattern years ago, it's very similar except it has several blocks done in the slashing style and is a bit more structured. Of course once you do a block or two, you can go in your own direction.
I'm giving away this pattern so if you think you'd like it, leave a comment saying so and I'll do a draw after Easter. Sorry, no anonymous comments.
 
To all those who celebrate Easter, have a wonderful weekend.

Saturday, March 16, 2013

A weeks worth of stitching

Panel 10 of the Trailing Vines pattern is ready for download at long last. You can access the panels as I do them over here or by clicking on the link below my header.

I'm behind myself on this project, I've started stitching on the ninth one and it makes me realise how much I've missed my leaves.
Pop on over to Dorothy's post to see her single bed size version done in a different colourway. It's looking pretty awesome.
I'm kept pretty busy these days with the Auntie Green and at the last class we got the instructions for the next stage which is the woven bias border and floral sprays that fit inside them.
These are just the leftover bias strips with plenty more to cut and stitch later on so they won't go to waste.
In the true style of the old quilt, the bias is laid down without a pattern so the end result will not be perfection. Oh the thrill and charm of having some inconsistencies is a nice change from trying to be exacting. This part is going to take awhile, it's slow but oh so pleasurable.
I did manage to get the last Mary Mannakee block finished, I took my sweet time with the finger shapes on the leaves and I know my circle is a bit oval but what the heck, it's staying put.
The next block won't be for ages, I'm trying to focus on just a few projects right now and am working towards a finish on one that's been hanging around for years.
Last weekend I popped out to attend the Stitches and Craft show. I've only been once before when it was mainly scrap booking and beading.
This time they incorporated the woodwork show which gave DH something to see. There weren't a lot of quilting stalls but I enjoyed the Japanese ones. I even got to play on the sit down Sweet Sixteen quilting machine and no, I have no plans to buy one.
I didn't buy much but I did pick up a tool that I've been watching out for and I must share with you.
This is one by Clover and looks like the tiniest crochet hook ever but in fact it's not for crochet.
You can click on the photo to get a closer look.
You've probably had those annoying coloured threads between the layers of a quilt with a light background. They are a real bear to get out with a pin which can damage the fibers.
Put the end of this tool between the layers and hook out that nasty thread without damaging the quilt, brilliant I say. It's also great for the getting snagged threads through to the inside of clothing too. It won't do any harm because that end is like a tapestry needle which separates the threads as opposed to piercing them.
 
Until next time, Janet

Thursday, March 7, 2013

Fabric fail

Sometimes the fabric that you think will work brilliantly fails dismally. Such is the case with the basket in the Auntie Green center.
Since I could see my pattern markings from the back, I tacked  the underlying pink fabric on from the back of the piece just outside the sewing line. The next stage was to sew the bias strips through the layers.
It's all going smoothly until I took a long hard look at my progress from a distance, as you do.
The brown and cream fabric doesn't look right to me, I would say because there seems to be an equal amount of cream and brown in the print. It was getting blended with the pink and looked kinda mushy to me.
Check out the picture below of the real Auntie Green basket.
If I can't live with it, it has to come out and here was the perfect opportunity to try out my new seam ripper. It has a rubbery end on the ripper and the case and the idea is to rub back and forth over the broken stitches and voila, they loosen and pull out.
It might seem a bit gimmiky but it actually worked quite well and I do hate picking little wee thread ends with my fingers.
Here's the basket all finished with the new brown fabric which I'm a lot happier with.
In case you were wondering, I appliqued the inside edges of the two outside pieces, trimmed the excess pink fabric and bias stems off and then proceeded to applique the outer edges if that makes sense.  That way I knew I wouldn't have to worry about covering everything or being too short on my seam allowances. It's happened to me before so it pays to leave more on than you think you need.
I just need to audition a couple of fabrics for two center circles on the blooms but that can wait until later.
I just can't sem to get a better photo of the colours in this one but you get the idea. It looks creamier in real life.
Class is tomorrow and I'm enthusiastic to get the next stage of the pattern to work on.
 
Until next time, happy stitching, Janet