
Tip #1 The invisible stitch.
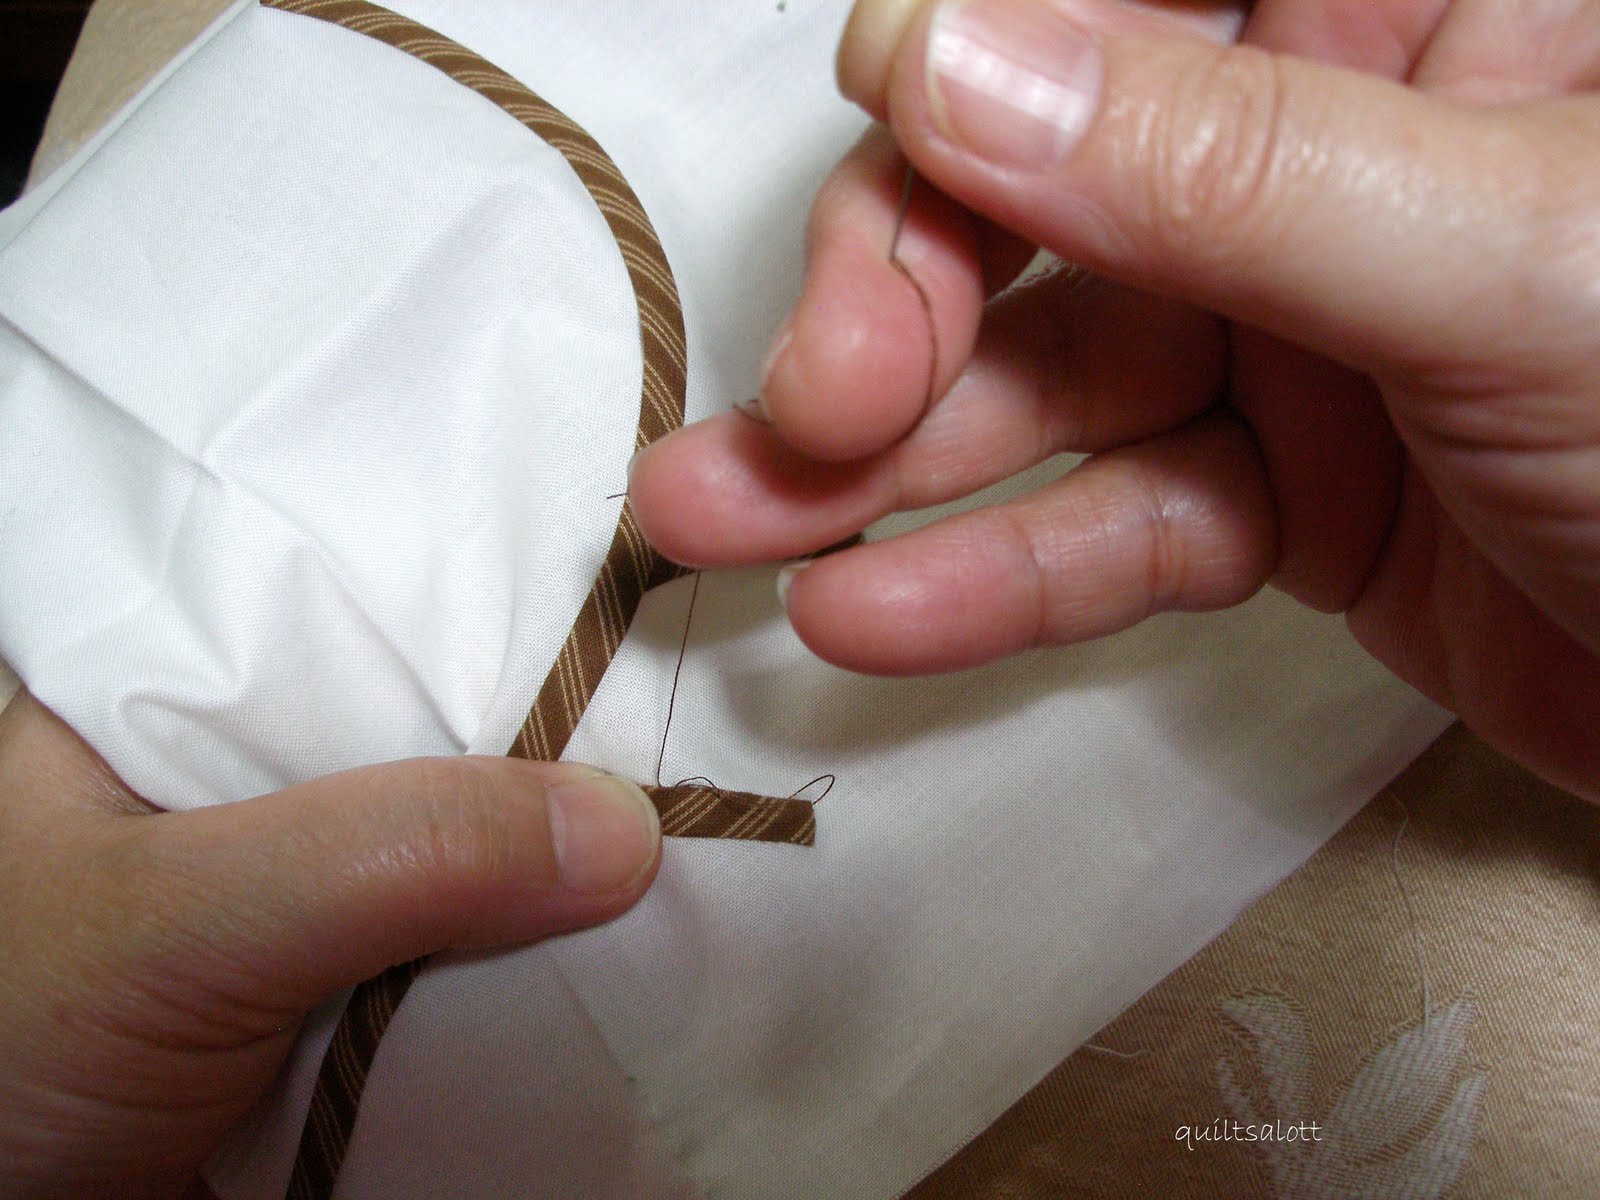
I keep control over my stitching by holding my work between my thumb and forefinger close to my stitching.
The tip of the needle slides down and slightly under the seam allowance.
The stitch is taken behind the thread that has just come through. This is to make sure the stitch you take next is perpendicular to the stitch already taken. The needle goes through at an angle and if you take the stitch in front or opposite the thread, the stitches will end up being angled and you don't want that.

As the stitch is taken, I use my left hand to fold down the work and bring my needle up. This will ensure that you are catching the background fabric and makes the stitch easier to take. Pick up a couple of threads in the seam allowance, not on the top of the applique piece. Practice and it will become natural after awhile.
Not every stitch I take is hidden but doing it this way has improved the look of my applique over time.,

Tip #2 Controlling the tension.
Remember my puckered work around the stems? I had been pulling the thread too tight so I've fixed that problem now by paying attention when sewing on bias stems. I like to glue baste the stems in place and it's important not to stretch it when you are positioning them.
As I pull through the thread for each stitch, my last two fingers are placed so that the thread wraps over them. This controls how tight I can pull the thread. With a bit of practice, you can get into a rhythym. You don't want the stitch to distort the applique but on the other hand you don't want the stitch too loose and popping up.

Tip #3
I like to use cotton thread but some like the YLI silk thread for applique. The silk is hard to keep in the eye of the needle because it's so fine and slippery.
Here's one way to secure the thread. Thread the needle and place the tail end between the thumb and finger. Grip it tightly. Push the sharp end of the needle through the thread to pierce it. Pull the needle all the way through and you should have it secured at the eye.

The second way is to wrap the tail end over your thumb or finger and pierce the thread with the tip of the needle. Pull the needle through.

In both cases, this is what it will look like before you pull the needle through.


I always cut my background larger than required because there will be some distortion. Don't judge your applique until it's pressed. I press on the wrong side with a folded towel underneath before trimming the block.
I hope these tips are useful to some of you. I don't consider myself as all knowing when it comes to applique. I consider it an ongoing learning experience and am always looking to improve.


.jpeg)


58 comments:
Ohhh what a wonderful tutorial!!
Your blocks is beautiful and so is your applique!! I can use as many tips as possible:)
I love the brown stem cut on the bias too.
I have trouble with my stitches being angled. I have to really think about what I am doing to keep them right above where I went into the applique shape and not angled.
I've just discovered your blog and think I will visit often!! Your applique is beautiful and thank you for sharing your wisdom in your tutorials
Great tips Thank you!! I just mentioned on my own blog that I thought I was having a problem with my tension when appliquing, there is so much puckering, pressing helps but obviously I need to not pull so tight!
Great tutorial! Thank you for sharing...your applique is beautiful.
I'm sure you have passed on a lot of knowledge to a lot of people, Janet - the blind stitch is very hard to define as accurately as you have so congratulations on this tutorial - well done!
Hugs - Lurline♥
Great tutorial. You are certainly a master quilter!
SewCalGal
www.sewcalgal.blogspot.com
Your quilt block at the top of the post is beautiful! What background fabric do you use that is worthy of such fine applique? So many seem too thin. Thanks for the great tutorial!
Wonderful blog!!! I purchased some 12wt thread after seeing your big stitch entry- and in the meantime saw a presentation by Pat Sloan on big stitich quilting. I look forward to your "tutes" Sandy
Beautifully written tutorial Janet..
many will benefit from it..thank you so much..
Julia ♥
Janet, THANK YOU so much for this wonderful tutorial, I am about to start appliqueing my tulips and this is just what I needed. I tend to rush my applique but after reading this tutorial I need to take it slowly and use smaller stitches. Thanks so much, this was wonderful to read. I prefer cotton thread to the silk thread. Ann
You always have terrific tips. So many different ways of doing things and we can always learn something new.
I just love your work and am so thankful to you for sharing a little of your knowledge with us all.
I look forward to each and everyone one of your blog posts. Your blog makes me happy. :o)
Thank you for the great tutorial. I need all the help I can get especially with applique. Great to know you use glue baste it, and thanks especially for the suggestions on not pulling the thread too tight. (I know I do that).
This is a most helpful tutorial. Would you considering doing one for the points of leaves? I am having trouble getting the tip of my leaves to look pointy....
I love your applique. You've made me hanker to get back to mine which I put aside for a while. It looks like you have a cushion or something on your lap when you sew is that correct? I've heard that this a good idea when appliqueing but I've never tried it.
Cheers
Munaiba
Thanks for the tutorial Janet! I tried a bit of your last turorial and my stitching have improved. Thanks for sharing a great skill. I really apprecaite it - Hugs Nat
Great tutorial Janet - and you do the most wonderful applique!
Thank you for sharing, Janet! Looking at your beautiful applique always makes me want to try some, myself...
; )
Thank you so much for the great tutorial. We do things much the same except the bit about folding down the fabric as you take the stitch, I'm going to be trying that :0).
Love the block shown above!!
Crispy
Thanks for the tips Janet. I think I go wrong with my bias stems right from the start with the glue. I am going to have to watch that.
Thanks for the tips. I've never tried securing the thread at the eye. Do you do that all the time or just with silk thread? How long a length of thread are you working with then? I have trouble with knotting and maybe it's because my tail is on the loose!
Since I am not someone who regularly appliques, this post is just perfect. I love to learn how to make the stitch virtually invisible. I may have missed this at some point, so forgive me, but what type of needles do you use?
Thank you for sharing your tips, Janet! Eminently useful! Piercing the silk thread is pure genius -- I'd only been shown to pull a small knot near the eye of the needle but can never remember to do it. I have some longstanding applique habits that need re-assessment, so your tips will have me doing more focused stitching. Thank you!
Thank you for these tips, Janet, your appliqué is so perfect and the block is gorgeous !
Love the tip on securing the needle! I'm one of those silk thread fans and I like to use thin needles (11's) for invisible stitches. The fewer times I have to thread that tiny eye the better.
Fabulous, I always love seeing how others do their applique, a wonderful way to pick up handy hints, thanks so much Janet for another awesome tute! xo
What great applique tips and techniques, Janet! Thank you for sharing with us. Given the amount of time we put into an applique project it is smart to stitch thoughtfully. Revisiting the how's and why's we do certain things is helpful. ; )
Thank you for sharing your tips! I'm getting my first applique project together and I appreciate all of your advice! I had no idea about piercing the thread to keep it from coming out of the eye--I will definitely have to try that.
Thanks for these wonderful tips. I had forgotten the idea of piercing the thread with the needle to secure it. I'll start using this again right away. Slowing down and thinking about each stitch will surely make my applique better and will also make me a calmer person. Thanks again.
There you go again!! Leaving me in awe of your talent. Deep sigh! :-)
Wonderful tips, Janet, thank you!
Thanks for a great tutorial Janet! Your applique looks perfect to me. I LOVE the block at the beginning of your post - is it one of the MM blocks?
Thank you so much for the tutorial. I just started to hand applique a few months back and this is so helpful. Stop by to see my "Children of the 30's" blocks, the clothing is hand applique.
Janet, my dear-
If you are not all knowing you certainly know a whole hell of a lot! And what you share in the way of tips is wonderful but far surpassed by what you share of your work and inspirations.
quitsalot might just as well be knowsaLOT! ;>
Rainey
I've been appliqueing for many years and I learned some new things I can't wait to try!! Thanks so much for sharing - your work is extradinary!!
Janet, Thanks a million! I can't wait to have some time so I can sit with my applique and go step by step through your post again and try things out. I will let you know!
xox
*I* consider *you* to be all-knowing with applique - even if you don't! Your work is fabulous! I have trouble with angled stitches. I'm going to re-read your instructions and see if that helps!
Thanks for those great tips, Janet!
I realized that I pretty well do the same as you when I stitch! I will try to fold down the edge, though, and take the stitches from the seam allowance. That makes sense! BTW, how do you prep your pieces?
Great suggestions Janet. I need to work on my tension more. No more puckers!
Thank you Janet! What wonderful tips and thank you for the pictures!
What a great bunch of tips...I have done the foolish trick of cutting my background too small, and you can guess what happened! Thank you!
It does become natural, doesn't it! Thanks so much for the great tips, Janet! Love your applique block at the start - just gorgeous!
Thank you very much Janet! I really appreciate you taking the time to photo and write this. They are all great tips and I need all the help I can get!
thank you for a great tut If only I had seen it one week earlier but at least the next block if be much better :-)
As one of my art teachers used to say, "There are so many ways of right", but your tips always seem to be the 'right-est'.
Thanks for taking the time to share these tips. A picture speaks a thousand words.
Great tips, Janet, thanks!
Your work is so beautiful. Your photos are great - I hadn't known about the anti-slip method for silk thread. I've heard of making a small knot at the end of the needle. I use silk and just put up with re-threading once in a while :)
I should try this!
What an inspiring tips! Do you want to come and visit me?
Great tips Janet -- your applique is gorgeous! Thanks for sharing with such great photos too!
Janet, I enjoy reading your blog. It is always inspirational and full of helpful tips and tutorials. After seeing this entry on applique it has inspired me to bring out my unfinished project! Thank you!
A wonderful place to visit!
I just finished a little Dresden plate appliqué and used two different types of silk thread. The first was Guterman and was thicker than the YLI. I prefer the YLI. It is thin and slippery, but I get a better look with it. Of course, I'm a little rusty on my appliqué. I'll have to do something about that :).
Thanks for your tips, I can't wait to get back at my applique. I'm working on Aunt Millie's Garden by POC.
Hi
Love the tutorial. Could you possibly show the back side of
it? Also, is this your pattern,
beautiful.
Janet
Brilliant tutorial Janet. You work is great!
Abbe
Thanks for posting this. I searched the web only last week, wondering what thread other people use for applique. I've always used cotton, but wasn't sure if that was "right". It's reassuring to know that your beautiful work uses cotton too.
I just saw a blog that you had made a thread keeper (and needles and scizzors) with yo yos at each end..it is ADORABLE! Will you be giving instruction/tute on that pattern- or selling the directions? I think this would be a terrific Christmas present-for several fellow quilters ;) Sandy
Que idea mas original!!!
mucha gracias.
Saludos
Post a Comment