First prepare your cut background panel by first pressing it in half lengthwise and width wise.
Run basting stitches in the pressed lines by hand or by using a large stitch on the sewing machine.
I draw the lines for the edges 2 1/2" from the middle and the top and bottom so that you can be sure the leaves will be contained and not move into the seam allowance. I use a pen that washes out.

BIAS STEMS
There are many methods to make bias stems and you may have your own way that you're comfortable with so go ahead with whatever method you prefer.
This is how I make mine. The stems are 1/4" for the branches and 3/8" for the main stem. I like to use the Clover bias makers.
First I starch and press the fabric.
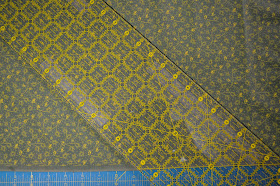
Line up the 45 degree line on your long ruler at the bottom selvage edge.
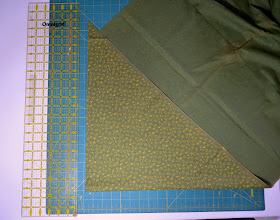
I've butted up another ruler at the top end to give me more cutting length. Make the cut from selvage to selvage and realign rulers as you progress across to the other selvage edge.
Once the initial cut is made, fold the cut edge in half.
Cut strips 3/4" wide from the cut edge for 3/8" stems and cut strips 1/2" wide for 1/4" stems. I actually cut a smidgen over the 1/2" which gives me better results.
For the main wider stem, you'll need to make joins so that your strip will measure around 100" long.
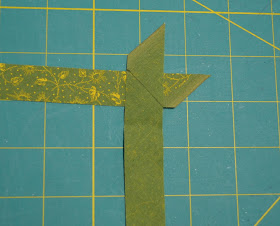
Place strips as they are in the photo below. Draw or eyeball the bias seam and sew.
Open up the strips and trim excess fabric.
Press seam open. I secure the seam allowances down with a little basting glue or fabric glue stick so that they will move through the bias maker smoothly.
I put the pattern on my light table and place the stems with the tiniest dots of basting glue, being careful not to distort the background fabric. I try to aim the dots of glue between the leaves.
The last panel I did differently by drawing the pattern on the background and then placing the stems.
I thread baste in the middle of the main stem and the branches on one edge. (click photo to see)
This is so that as the leaves are sewn on, you can slip them under the stem so I would do one side of the branch, undo the basting and fill the other side with leaves.
Sew the edges of the stems as you complete adding the leaves to each branch.
It's your choice if you draw the pattern on panel or not. If you don't like to do that, I would suggest putting a dot on the bottom and top of each leaf placement and use those to guide you.
Panel one is now available for download. Click on the page under my header to go to the Trailing Vines page. I'm going to upload photos of each branch from panel one onto flickr. Once I've done that, I'll add the link to the Trailing Vines page.


Great post with lots of tips that I am going to use. Thanks so much.
ReplyDeleteTHAN UOU so much, dear Janet, for such clear tutorial, pictures, and tips, and for the time you certainly devoted to them ! ;>)
ReplyDeleteXOXOXOXOXOXOXO
NADINE
Thanks Janet I know how much work this is for you.
ReplyDeleteYour just so generous and kind to share this will all of us. Susan McCord is one of my favorite quiltmakers, you know when someone asks if you could invite 5 people to dinner , her name is one I always include....
wouldn't that be amazing?
Kathie
What a wonderful tutorial. I'm not able to join the quiltalong but I've learnt lots of tips. Thanks Janet!
ReplyDeleteThanks for all the info Janet! I've always done my leaves first and then the vines, but your way is MUCH better!
ReplyDeleteThanks for such a great tutorial - so many great tips!!
ReplyDeleteThanks for the tute! I liked seeing how you marked with dots for the placement of the vines. Every little tip helps.
ReplyDeleteQuestion for you, do you glue down your stems and then also baste them down?
ReplyDeleteThis is so great that you offering this to your readers. I am going to follow along but just don't have the time to pursue this right now.
ReplyDeleteJanet you have put in an incredible amount of work on this, thank you so much. I have learned so much from your post and am anxious to start. This will be so fun to do with others!
ReplyDeleteHappy Stitching,
Cheri
Thanks so much for all the detail in your post - so many details that I wouldn't have thought of! I'm so excited to start but the fabric I ordered has not arrived. Canada Post and customs can take forever!!
ReplyDeletegreat tutorial for your readers on prepping stems. I do it the same way, but must admit that I sew them down, ala gwen marston style.
ReplyDeleteI so wish I could join in this, I'll reconsider after the quilt show. I so love this quilt and really would love to make one
Thank you so much - as always great instructions and tips...the photos are so clear too! This will be a big help when it comes to those vines in our BTCT borders...
ReplyDeleteNot doing applique until just this past year, the Clover Bias tape makers were a new tool in my sewing room...I was so excited using them the first time one would think I had invented them :o)
It's wonderful reading all this. It is a quilt that has always amazed me.
ReplyDeleteJane
Great tutorial....I can't wait to start...I have to wait until I get back....
ReplyDeleteI won't be back in the states until the 24th.I'm out of the country visiting my daughter and family..... celebrating my granddaughters 13th birthday.
I'm going to try to make it little larger. I might have to add another row..... I'll see how it goes......
I've been reading your back posts....I've enjoyed them very much...especially when Mr.Q thought the vine on your trailing vines was too large.
Some great tips for the applique. Thanks so much for sharing this wonderful quilt! :)
ReplyDeleteJanet,
ReplyDeleteI find this so helpful! I am a newbie in hand applique as you know... and I have never thought of hand-basting the vine. I will have to remember that for my next hand applique endeavor.
Thanks for the great instructions! That is so smart, basting down the middle of the stem. I swear I would be just stabbing myself with pins or fighting to get the glue loose.
ReplyDeleteExciting news for plant enthusiasts! The guide on making long stems for trailing vines is now available. Panel one offers detailed instructions and tips to help you achieve lush, cascading greenery. Perfect for anyone looking to enhance their indoor or outdoor gardening skills.
ReplyDeleteUK Free Business Listing Site